Installing the LWP
Before you begin
Make a backup of your data stored on the disk of your PC, if any. You can use a usb device or your home directory. Your home directory is network storage and does not get touched during the installation.
If you have sudo rights, you should know where you’ve put your files. If you don’t have sudo rights, you can only place files in /var/tmp or maybe in /tmp if you never restart your PC.
Any extra disks in your PC will not be touched during the installation. Ask us to make them available after the installation.
To use LWP we require the following partitions:
- EFI/esp type partition, can be between 100-500Mb (does not need to be formatted)
- linux boot: 1-2Gb, leave unformatted
- linux root: 100Gb or more, leave unformatted
- linux swap: optional but recommended for desktop systems to be equal to the amount of available RAM
If your disk already contains an EFI type partition, it is safe to remove all linux type partions. If the remaining free space is large enough (>= 100Gb) all needed partitions will be created automatically. If there is no EFI partition and you want to be able to dualboot Windows/Linux you will have to start by re-installing Windows. THIS WILL WIPE THE DISK!
Existing Windows partitions are left untouched. You can use the cfdisk command from the menu to delete and create partitions, make sure to "write" your changes before exiting cfdisk. Beware that resizing existing partitions will not change the underlying filesystem.
After you've made your backups, restart your PC.
Make the BIOS UEFI ready
It is probably best to ask for help with this, but you can do this yourself:
 - press ESC while the computer powers on
 - select BIOS menu
 - select Advanced
   - select Boot Options
     - enable UEFI boot
   - select Secure Boot Configuration
     - Legacy Support Disabled and Secure Boot disabled
 - save and reboot
 - press ESC while the computer powers on
 - select BIOS menu
 - select Advanced
    - select Boot Options
      - under UEFI boot order move network IPV4 to the top
 - save and reboot
If you want to be able to use Windows (UWP/UFC) as well as Linux (LWP), install Windows first and leave about 100Gb free space for Linux. Installing Windows takes about 50 min. Installing LWP also takes about 50 min.
(re)Install the LWP
On most systems, booting from the network is configured as default. If that is not the case on your system, you can press F12 directly after you turn on your PC to boot from the network.
- From the menu, choose Install LWP.
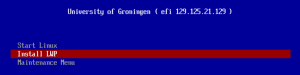
The ipxe menu for LWP only.

This will start the installer and give you a login screen.
- Login with your UG account.
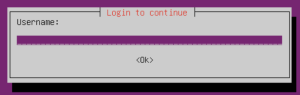
The installer login screen. - Choose "Standard LWP" for the fully automated installation.
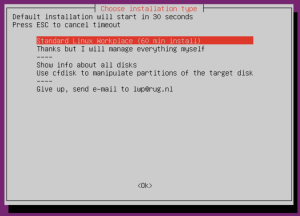
Standard LWP install. - Confirm your choice and the install will start. It takes around 1 hour.
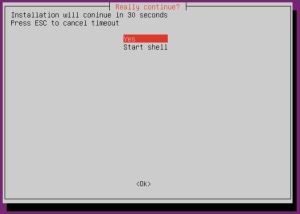
Confirm installation.


That's it. The rest happens automatically. When it’s done the login screen will appear and you can login.
(re)Install dual-boot UWP/LWP
If only the LWP has to be (re)installed follow the procedure for (re)Install the LWP, but the Install LWP menu-item is in the Maintenance sub-menu.

The servicedesk can help you (re)install the UWP on your machine.
Note: Reinstalling the UWP will also require reinstalling the LWP. Reinstalling the LWP does not require reinstalling the UWP, as long as there is enough disk space for the LWP to fit.
Not enough space
LWP only
Wipe the system disk
First make sure you have not forgotten to backup any data on the disk.
In the network boot menu (press F12 directly after turning on your PC) from the Maintenance sub-menu, select Parted Magic to start it.

We are going to create a new and empty partition table for the disk. If it didn't start automatically (it should) start GParted by opening the Partition editor program from the desktop.

Make sure you have your system disk selected in the top right corner; It should be selected by default. Go to Device and select Create Partition Table.

Select gpt as the new partition table type, click Apply and you're done. The disk is now completely empty and ready for a fresh installation.
Dual-boot
Resize the UWP partition
If you’re familiar with resizing partitions and/or not afraid of losing anything because you make backups like you're supposed to, consider resizing the UWP NTFS partition if you have enough free space there. You can use Parted Magic for this.
In the network boot menu (press F12 directly after turning on your PC) from the Maintenance sub-menu, select Parted Magic to start it.

Resize the NTFS partition using GParted (should start automatically, else open the "Partition editor" program from the desktop) so you have at least 80GB of free space to install the LWP in.

A more detailed explanation on Parted Magic can be found here.
After resizing is done, restart your system and start the LWP installer, the installation should now continue without any problems.